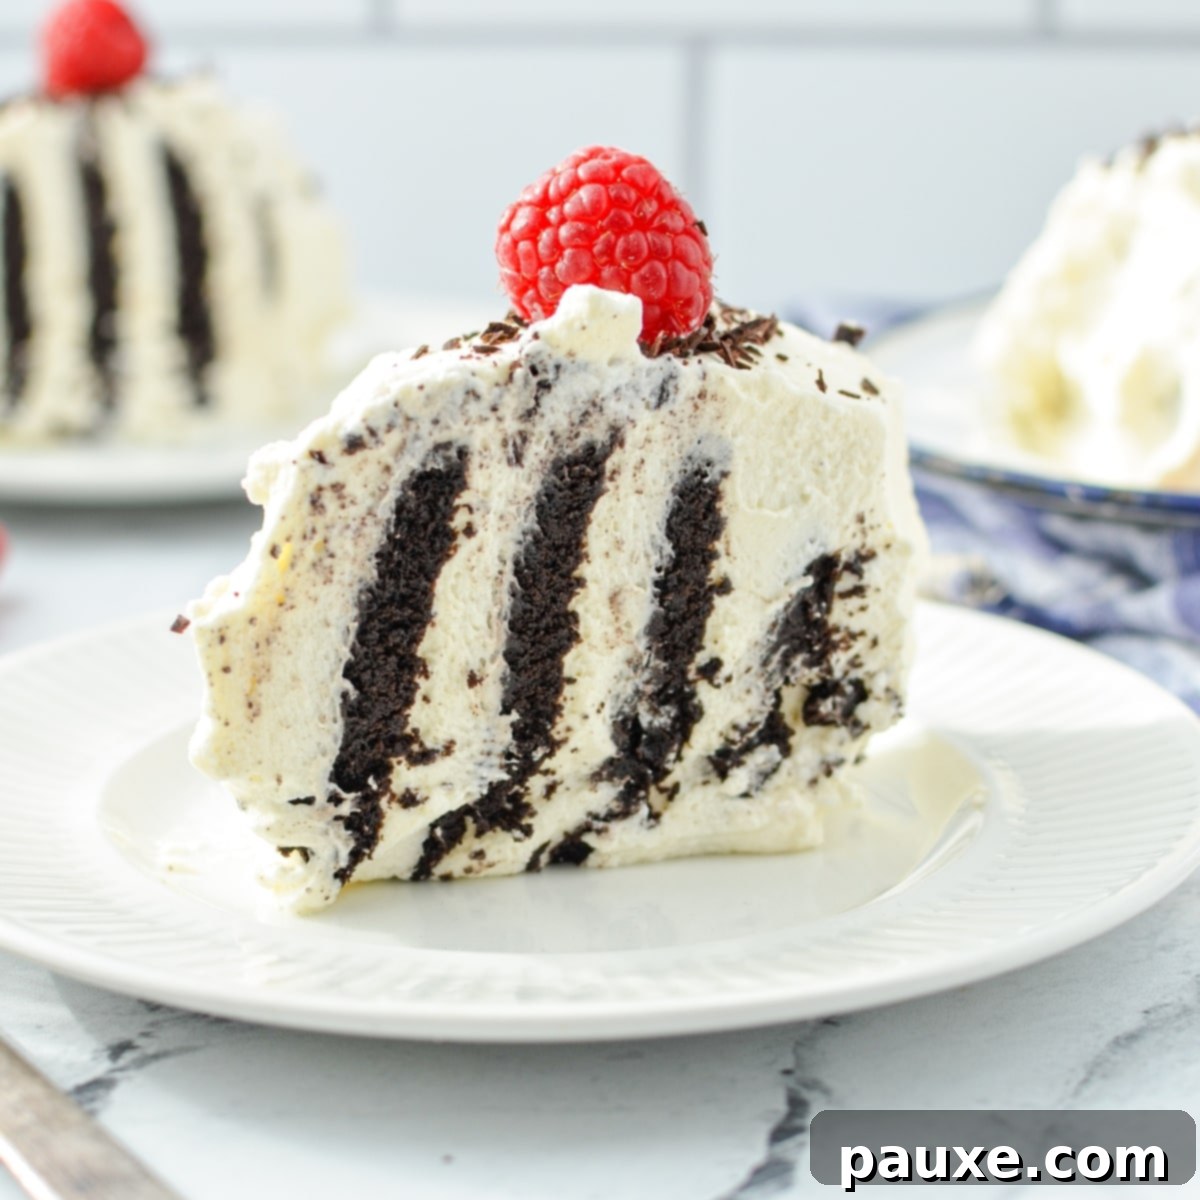
Welcome to the ultimate guide for creating the most delightful and effortless dessert: the Chocolate Wafer Icebox Cake, famously known as Zebra Cake. This iconic no-bake treat is a testament to culinary simplicity, requiring only a handful of common ingredients and absolutely no oven time. Imagine crisp, deeply chocolatey wafer cookies layered with luscious, homemade whipped cream, transforming overnight into a moist, cake-like confection with striking stripes. Perfect for sweltering summer days, festive celebrations, or simply a comforting everyday indulgence, this easy dessert promises to impress with minimal effort.
Whether you call it a Famous Chocolate Wafer Icebox Cake or a visually stunning Zebra Cake, its charm lies in its ease of preparation and irresistible taste. Join us as we explore the rich history of this classic dessert, detail its simple construction, and offer tips to make it truly unforgettable.
The Enduring Legacy of Icebox Cakes: A Dive into History
The story of the icebox cake, including our beloved Chocolate Wafer Icebox Cake, is deeply intertwined with American culinary history, particularly gaining prominence during challenging times. My fascination with Depression-era recipes led me to discover this gem, a period not so distant that our grandparents, like mine and my husband’s, didn’t live through it. It’s a fascinating glimpse into how necessity truly breeds culinary invention.
During the Great Depression and World War II, economic hardship and subsequent sugar rationing made traditional baking a luxury. Families faced strict limitations on essential ingredients, as much of the national supply was directed overseas to support troops. This era saw the rise of ingenious, budget-friendly, and simple recipes. Icebox cakes became incredibly popular because they relied on readily available, pre-packaged ingredients like cookies, crackers, and gelatin, eliminating the need for baking and conserving precious resources. They offered a satisfying, sweet escape without requiring expensive ovens or hard-to-find ingredients, making them a staple in many households.
These desserts were an accessible luxury, transforming humble components into something special with just a few hours of refrigeration. The term “icebox” itself harks back to a time before electric refrigerators were common, when insulated cabinets cooled by blocks of ice were the primary means of food preservation. This simple method of chilling allowed for the magical transformation of crisp cookies into a tender, cake-like texture, creating a dessert that was both practical and delightful.
Effortless Elegance: Why This No-Bake Dessert Reigns Supreme Today
Fast forward to today, and the allure of icebox cakes remains as strong as ever, albeit for different reasons. In our fast-paced, modern lives, time is a precious commodity. Juggling work, commutes, family commitments, and digital distractions often leaves little room for elaborate meal preparation, especially when it comes to desserts. This is where the Zebra Cake, or Famous Chocolate Wafer Icebox Cake, truly shines.
This remarkable dessert is crafted with just chocolate wafer cookies and fresh whipped cream, demanding absolutely no oven time. The entire process involves a quick assembly, followed by a period of chilling. That’s it! You simply layer, let it rest in the refrigerator, and then you’re ready to effortlessly slice and serve a spectacular treat. It’s the ultimate shortcut for busy individuals and families who crave homemade goodness without the fuss.
But convenience isn’t its only virtue. The true magic lies in its taste and texture. My husband, for instance, has actually requested this simple concoction as his birthday cake! It boasts a wonderfully rich, chocolatey flavor and a melt-in-your-mouth consistency that is surprisingly sophisticated. Many liken its flavor profile to a simplified Black Forest cake, minus the kirsch. The transformation of the crunchy wafers into a moist, tender “cake” through the absorption of the whipped cream is nothing short of culinary alchemy. We are confident you will fall in love with this easy yet impressive no-bake dessert just as much as we have!
Key Ingredients for Your Chocolate Wafer Icebox Cake
Creating this iconic Zebra Cake requires only a few core ingredients, but the quality of each plays a crucial role in the final flavor and texture. Here’s what you’ll need to assemble this simple yet exquisite dessert:
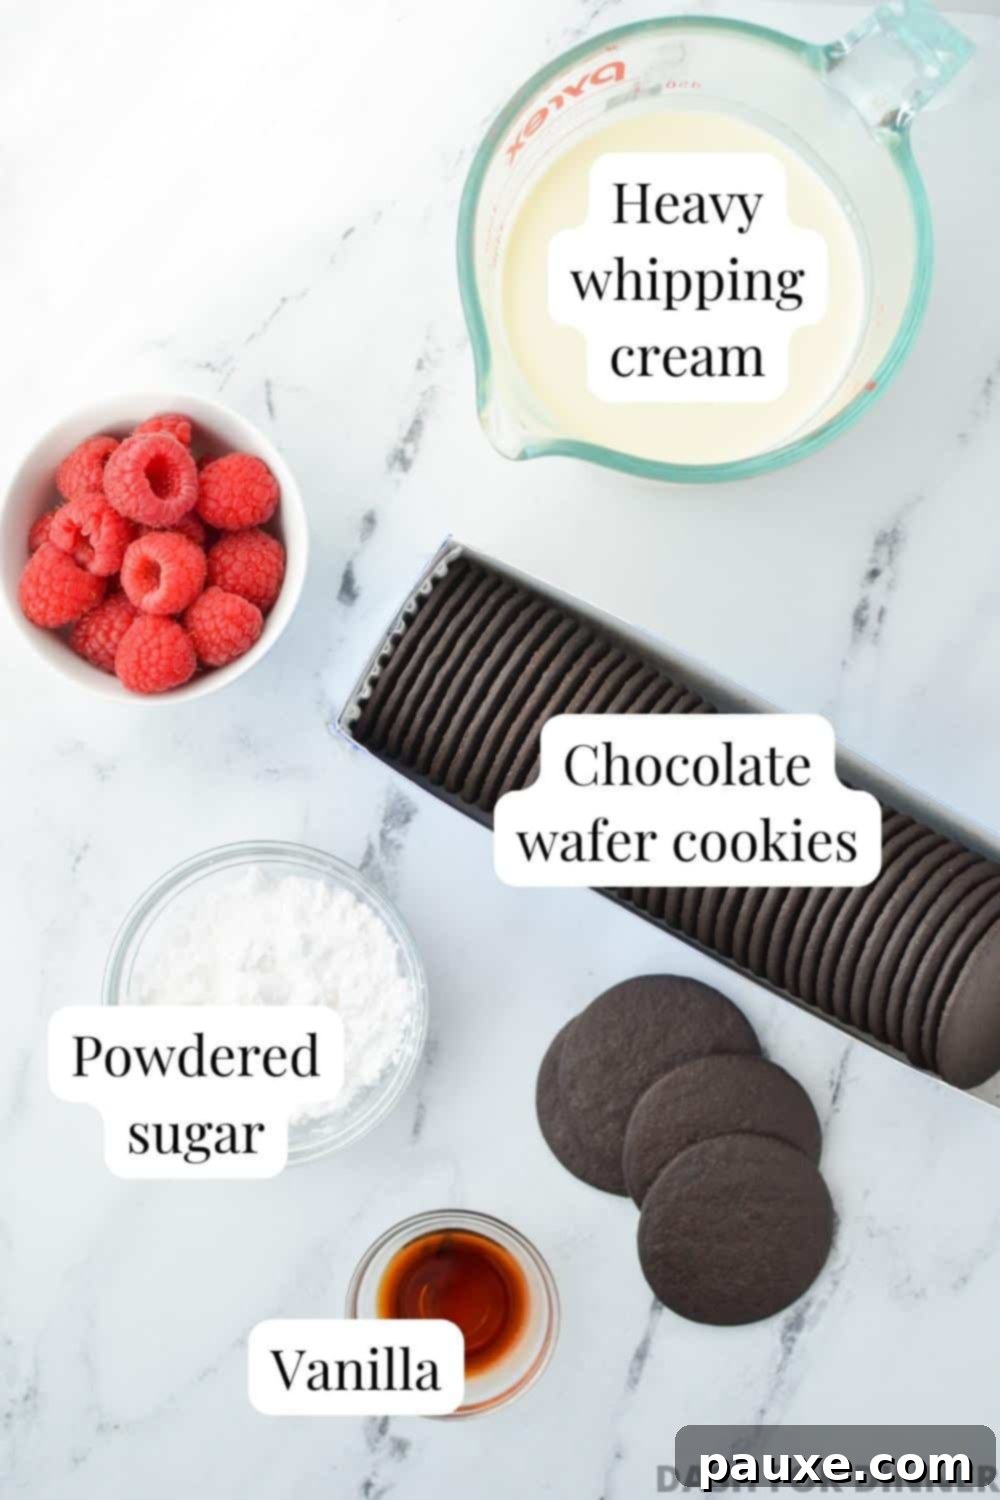
- Chocolate Wafer Cookies: These are the backbone of your Zebra Cake. In the U.S., look for Nabisco Famous Chocolate Wafers, typically found in the cookie aisle or near graham crackers. Canadians will find Christie’s Chocolate Wafers. These thin, dark, crisp cookies are essential as they soften beautifully when chilled with the whipped cream, creating the characteristic cake-like texture and rich cocoa flavor. Do not substitute with regular chocolate cookies, as their texture and sugar content are different.
- Heavy Whipping Cream: For the most luxurious and stable whipped cream, use cold heavy cream (sometimes labeled heavy whipping cream) with a fat content of 36% or higher. Chilling your bowl and whisk attachment beforehand can also help achieve perfectly stiff peaks. While store-bought whipped cream can be used as a shortcut, homemade offers unparalleled freshness and flavor, and we highly recommend it for the best results.
- Sugar: Powdered sugar (also known as confectioners’ sugar) is highly recommended for its fine texture, which dissolves instantly into the cream, resulting in a smooth, silky, and stable whipped cream. It also contains a small amount of cornstarch, which acts as a stabilizer. While granulated sugar can be used, it may result in a slightly grainy texture and less stable whipped cream. Adjust the amount to your preferred sweetness level.
- Vanilla Extract: A touch of pure vanilla extract elevates the flavor profile of the whipped cream, adding a warm, aromatic note that complements the deep chocolate of the wafers beautifully. While optional, it’s a small addition that makes a significant difference in taste.
Time-Saving Shortcut Option:
- Cool Whip: If you’re truly pressed for time or prefer a ready-made option, a tub of thawed frozen whipped topping (like Cool Whip) can be substituted for the homemade whipped cream (heavy cream, sugar, and vanilla). Ensure it’s fully thawed in the refrigerator before use for the best consistency.
Optional Garnishes for a Flawless Finish:
Elevate your Zebra Cake with simple yet elegant garnishes that add both visual appeal and complementary flavors.
- Chocolate shavings: A classic touch that enhances the chocolatey theme.
- Fresh raspberries or strawberries: Their vibrant color and tartness provide a beautiful contrast to the rich cake.
- Mint leaves: A refreshing touch of green and a hint of fresh aroma.
- A dusting of cocoa powder: For an extra layer of chocolate richness and a sophisticated look.
- Mini chocolate chips: Adds texture and an extra burst of chocolate.
- Crushed leftover cookies: A delicious way to incorporate more of the wafer goodness.
- Drizzle of chocolate syrup or caramel sauce: For added decadence and visual flair.
Crafting Your No-Bake Chocolate Wafer Icebox Cake: Step-by-Step
The beauty of this Zebra Cake lies in its simple assembly. Follow these steps to create a show-stopping dessert with ease.
Preparing the Velvety Whipped Cream
Homemade whipped cream is incredibly easy to make and yields superior results. For best results, ensure your heavy cream is very cold, and if possible, chill your mixing bowl and whisk attachment for 10-15 minutes beforehand.
- Combine Ingredients: Pour the well-chilled heavy cream into a large mixing bowl or the bowl of a stand mixer fitted with the whisk attachment. Add the powdered sugar and vanilla extract.
- Whip to Perfection: Begin whipping the mixture on medium-high speed. As the cream thickens, you’ll notice soft peaks forming. Continue whipping until stiff peaks form. This typically takes about 3-4 minutes with a stand mixer or electric hand mixer. Stiff peaks mean that when you lift the whisk, the peaks hold their shape firmly without collapsing.
- Check Consistency: Stop the mixer periodically and scrape down the sides of the bowl with a spatula to ensure all ingredients are evenly incorporated. The whipped cream should be light, airy, and hold its shape.
- Ready for Assembly: Once stiff peaks are achieved, your homemade whipped cream is ready to be used immediately in the cake assembly.
Assembling the Iconic Zebra Cake
PRO TIP: To ensure an easy cleanup and smooth transfer, line your serving platter with a strip of parchment paper before you begin assembly. This creates a mess-free workspace and can aid in moving the cake if needed.
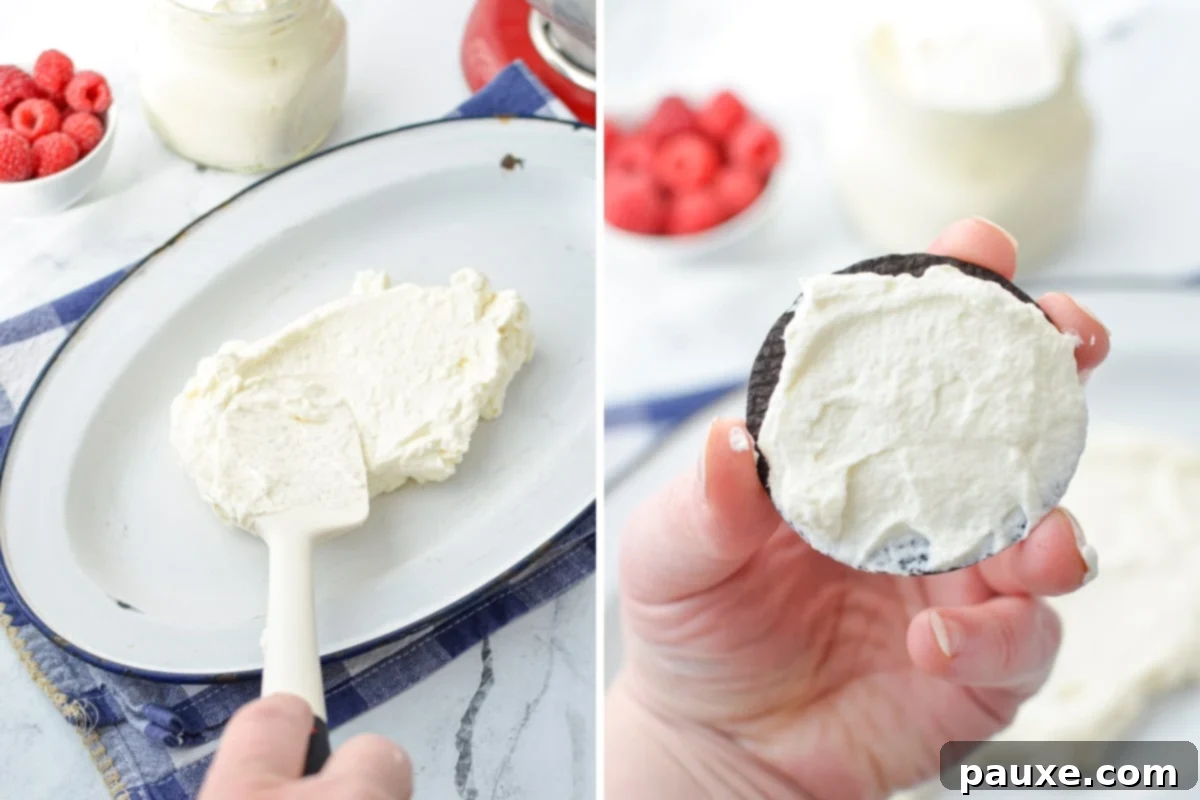
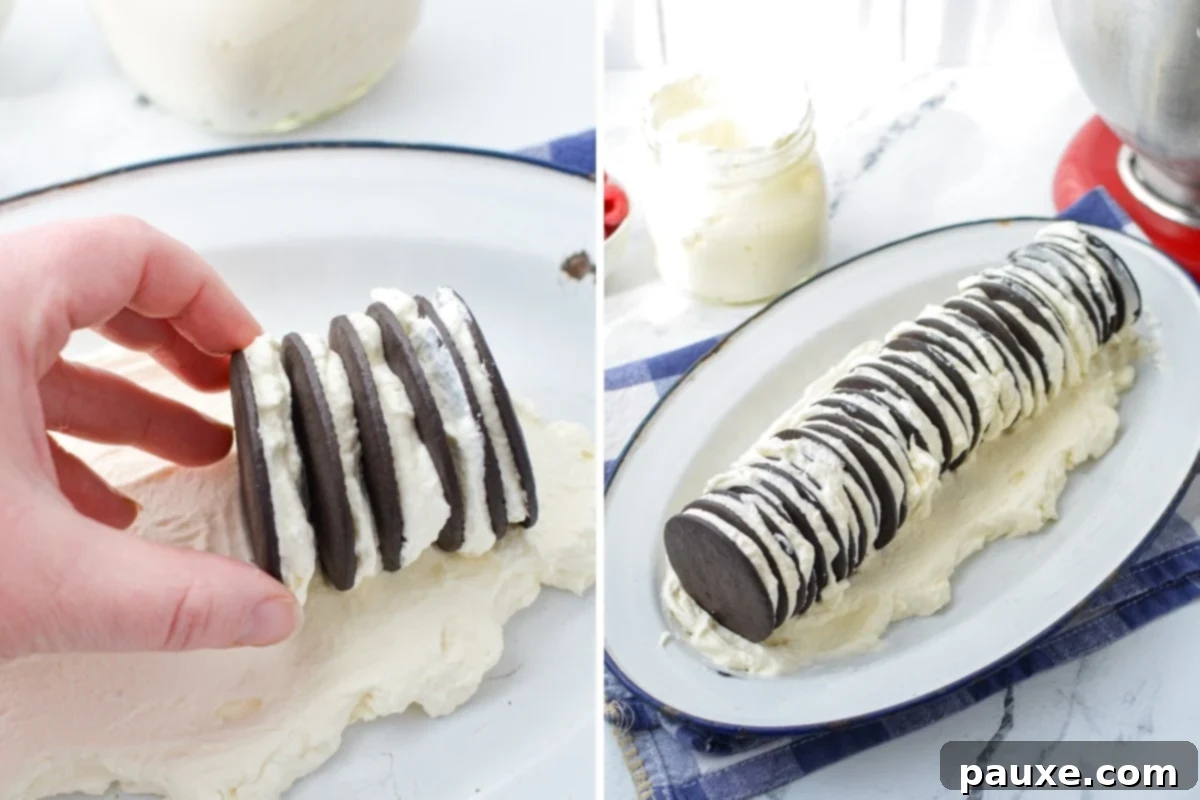
- Create the Base Layer: Begin by spreading approximately ½ to 1 cup of your prepared whipped cream (or thawed Cool Whip) onto the center of your chosen serving platter. Form it into a long, rectangular shape, about 1 ½ inches wide. This initial layer will serve as the foundation for your cookie log and help anchor it in place.
- Assemble Cookie Sandwiches: Take one chocolate wafer cookie and spread a generous tablespoon of whipped cream over its flat surface. Place another chocolate wafer cookie on top, creating a cream-filled sandwich. Repeat this process until you have a stack of 4-5 sandwiched cookies.
- Form the Cake Log: Carefully place the stack of sandwiched cookies onto the rectangular whipped cream base on your platter, positioning them on their sides so that the round edges face left and right. This creates the first section of your “log.”
- Continue Layering: Continue spreading whipped cream on individual cookies and attaching them to the end of your growing log, always placing them on their sides. Keep adding cookies in this manner, extending the log until you’ve used up all your chocolate wafer cookies or have filled your serving platter to the desired length. The key is to keep the cookies gently pressed together.
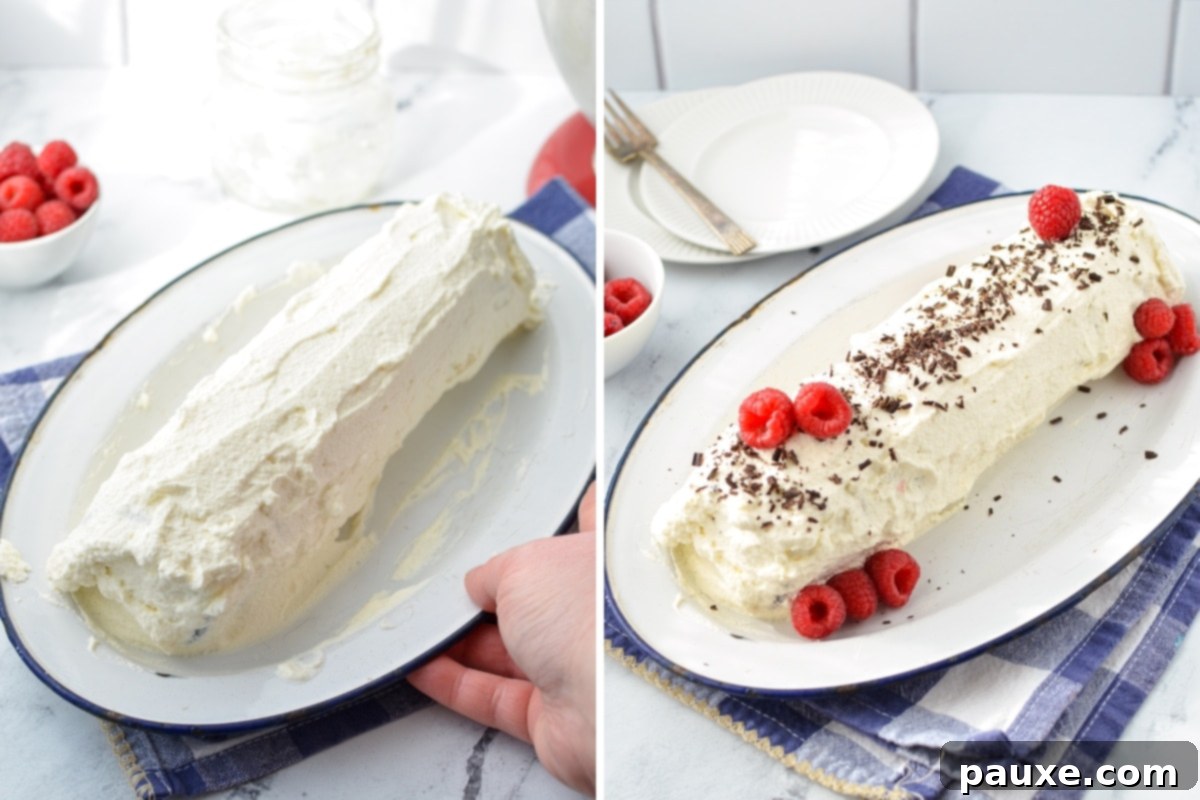
- Frost the Log: Once your cookie log is fully assembled, use the remaining whipped cream to generously frost the entire log. Spread the cream evenly over the top and all exposed sides, ensuring the cookies are completely covered. This layer not only adds to the deliciousness but also helps the cookies soften evenly.
The Essential Chilling Period
Like all exquisite no-bake icebox cakes, this Zebra Cake absolutely requires an adequate chilling period in the refrigerator. This isn’t just a recommendation; it’s the magical step that transforms a simple stack of crisp cookies and cream into a tender, luscious cake-like texture. During this crucial time, the moisture from the rich whipped cream gradually permeates and softens the firm, dark cocoa wafers. The cookies absorb the cream, losing their crunch and becoming wonderfully soft, moist, and incredibly easy to slice.
- Optimal Chill Time: For the best and most consistent results, aim to chill your cake for approximately 8 to 12 hours. While a little less or a little more time will still yield a delicious dessert, this window allows the cookies to fully absorb the moisture and achieve that perfect cake-like consistency.
- Strategic Planning: If you plan to enjoy the cake as an evening dessert, preparing it first thing in the morning ensures it will be perfectly set by dinner. For afternoon parties or birthday celebrations, assembling the cake the night before and allowing it to chill overnight guarantees a ready-to-serve masterpiece.
- Protecting Your Creation: It’s important to wrap your cake gently with plastic wrap during chilling. To prevent the plastic wrap from sticking to and smooshing the delicate whipped cream, I like to insert a few toothpicks into the cake at strategic points. This creates a small tent, allowing you to drape the plastic wrap without it directly touching the frosting. This simple trick preserves the beautiful, smooth finish of your cake.
The Art of Decorating Your Masterpiece
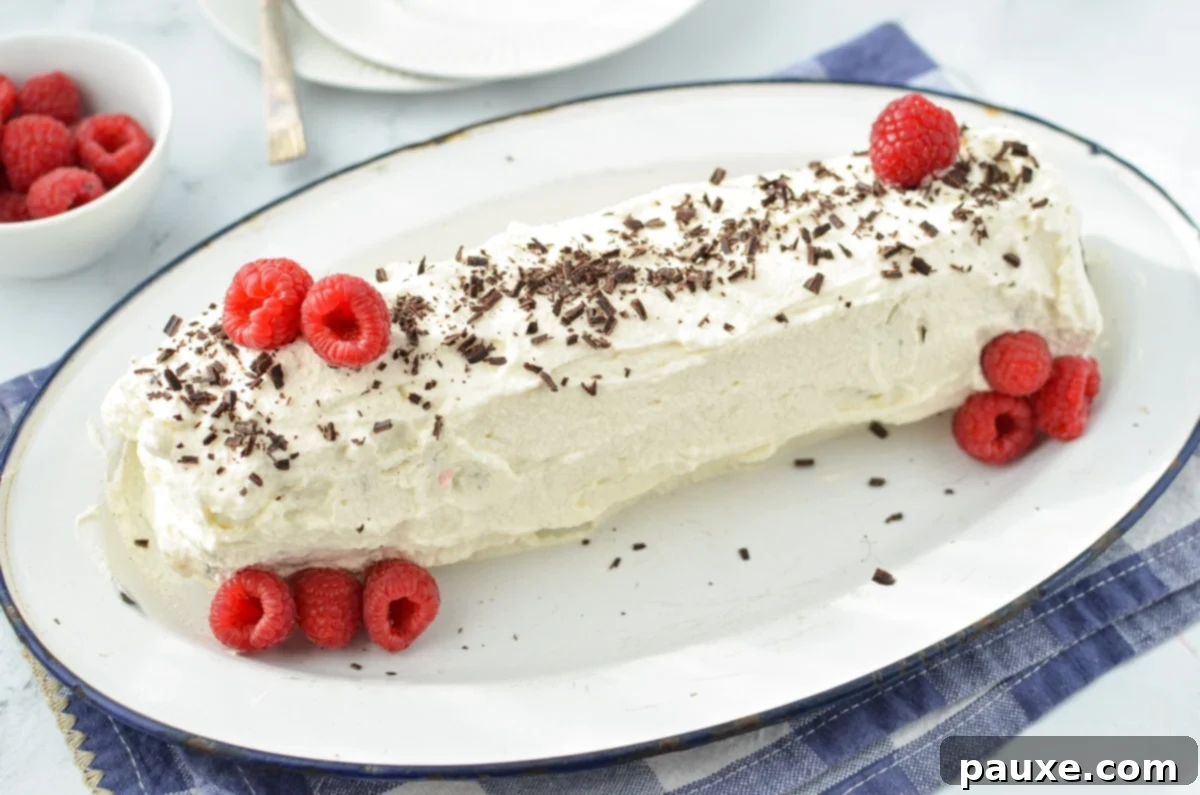
Once your Chocolate Wafer Icebox Cake has completed its essential chilling time and has achieved that perfect cake-like texture, it’s ready for its final flourish: decoration! This is where you can let your creativity shine and personalize your dessert to match any occasion or preference.
Here are some delightful ideas to adorn your Zebra Cake:
- Elegant Chocolate Shavings: A timeless choice that amplifies the chocolate theme. Use a vegetable peeler on a block of chocolate to create beautiful curls.
- Vibrant Fresh Berries: Bright red raspberries or sliced strawberries offer a stunning visual contrast and a burst of fresh, tart flavor against the rich, dark cake. Blueberries or blackberries can also be lovely.
- Refreshing Mint Leaves: A few strategically placed fresh mint leaves add a touch of color and a subtle aromatic lift.
- Dusting of Cocoa Powder: For an extra layer of chocolatey depth and a sophisticated, velvety finish. Use a fine-mesh sieve for an even dusting.
- Mini Chocolate Chips: Sprinkle these over the top for added texture and concentrated chocolate flavor.
- Crushed Leftover Cookies: If you have any extra chocolate wafers, crush them coarsely and sprinkle them over the cake for a delightful textural element and an echo of the cake’s core ingredient.
- Chocolate or Caramel Drizzle: A zig-zag pattern of chocolate syrup or caramel sauce can add a touch of gourmet flair and extra sweetness.
CHEF’S HINT: To maintain a pristine presentation, prepare your garnishes ahead of time. Place shaved chocolate, fresh berries, and other toppings in separate small bowls and store them in the refrigerator until just before you’re ready to serve. This keeps them fresh and allows for quick, stress-free decorating.
The Signature Slicing and Serving
The moment of truth! After your magnificent icebox cake has been beautifully decorated and is ready to be enjoyed, the way you slice it is crucial to revealing its distinctive charm.
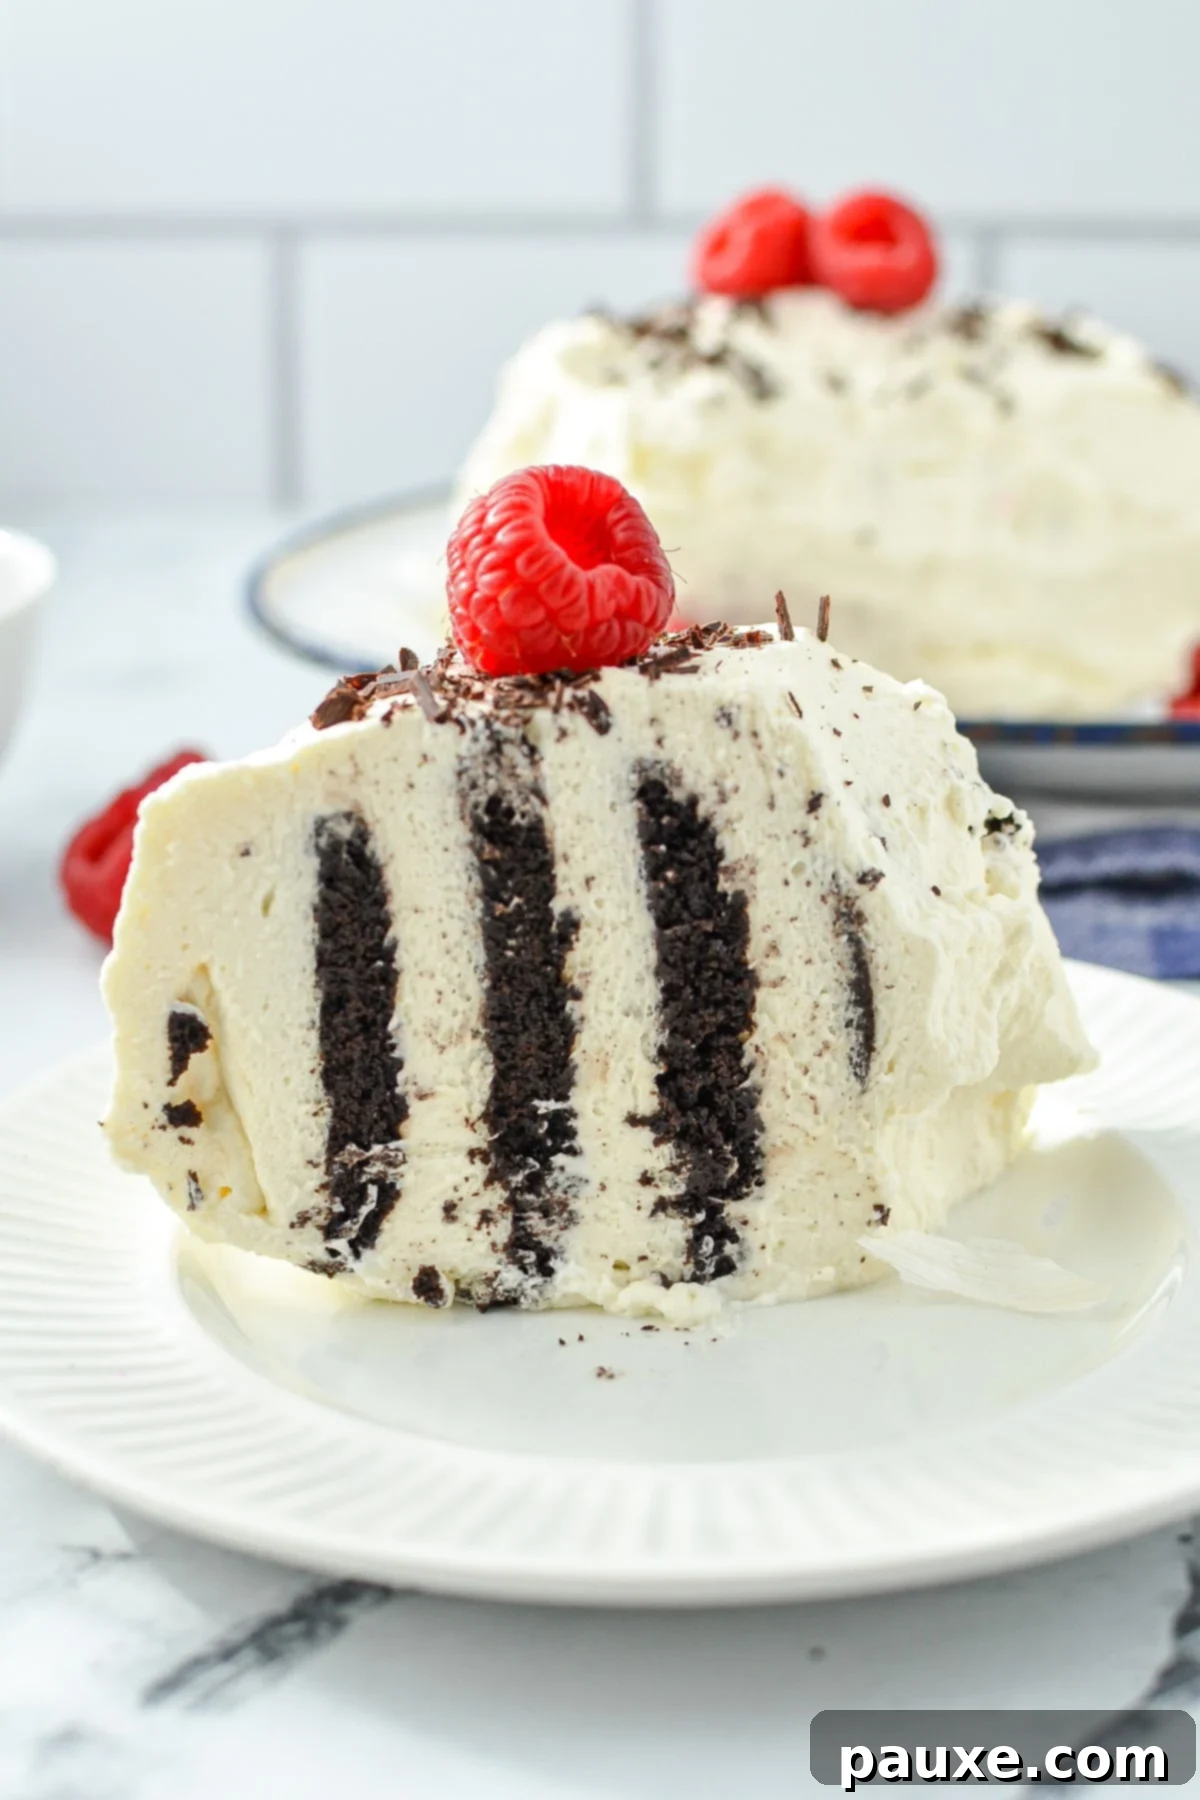
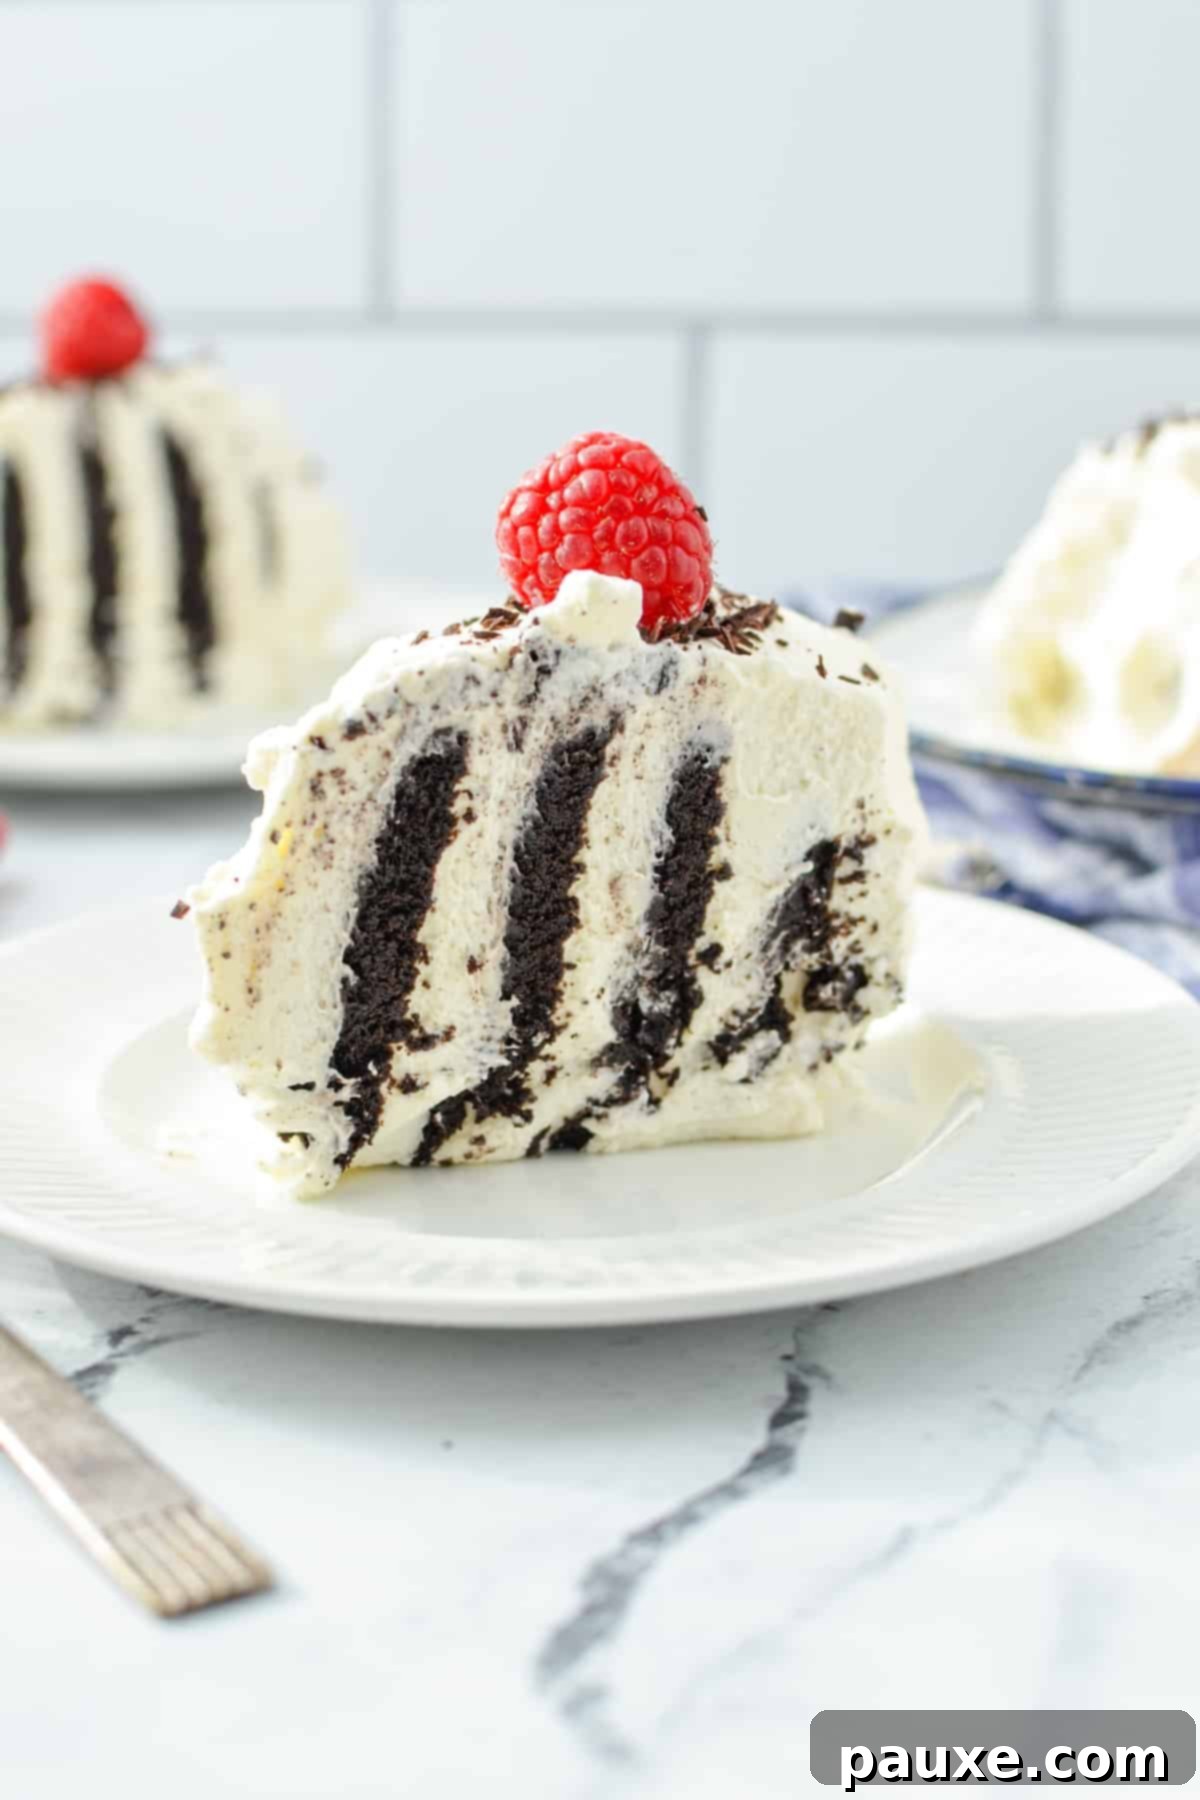
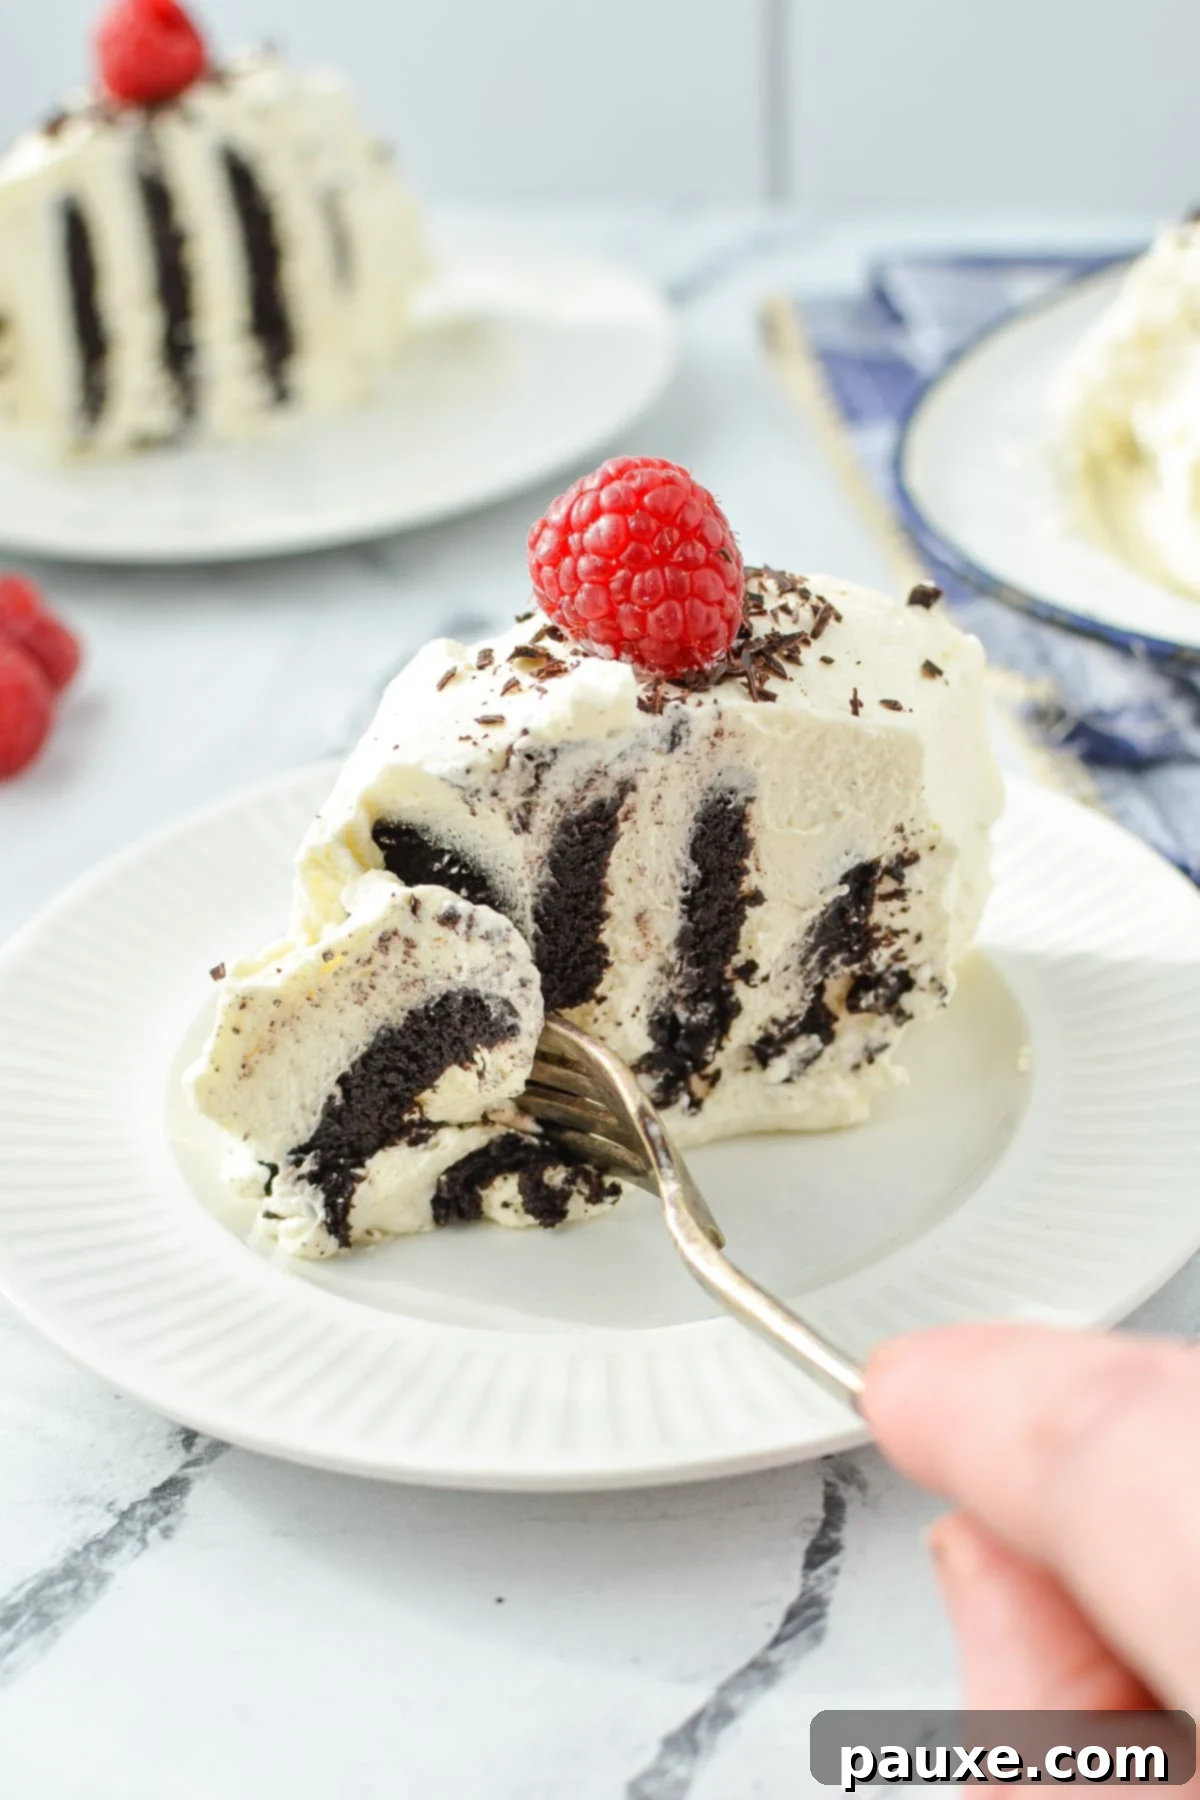
To truly appreciate the visual spectacle and earn its “Zebra Cake” moniker, you must use a sharp knife to cut the cake into slices diagonally.
It’s really important to slice it diagonally because this specific cutting technique is what exposes the alternating layers of dark chocolate wafer and white whipped cream, creating that stunning, striped pattern on each slice. If you were to slice it straight, you’d miss out on this beautiful visual effect that makes the Zebra Cake so unique and appealing. Each diagonal slice will present a mesmerizing display of dark and light, making every piece a work of art. Serve immediately after slicing for the best texture and presentation.
Creative Variations and Delightful Substitutions
While the classic Chocolate Wafer Icebox Cake is perfection on its own, its simple structure makes it incredibly versatile for customization. Don’t be afraid to experiment with these delicious variations and substitutions to create a unique dessert that caters to your taste and available ingredients:
- With Oreo Cookies: For an extra dose of chocolate and creaminess, swap out the chocolate wafers for Oreo cookies. For the best result, separate the Oreo cookies and remove the cream centers. Layer the whipped cream in an 8×8 inch baking dish or a springform pan, then add a layer of the separated cookie halves. Alternate layers of whipped cream and cookie halves, ensuring you end with a generous layer of whipped cream on top. The chocolate cookies will soften beautifully, creating a rich and indulgent dessert.
- With Graham Crackers: If you prefer a lighter, more classic flavor, graham crackers are an excellent substitute. You can either maintain the original log-style cake by sandwiching graham crackers with whipped cream, or layer them into a baking dish, alternating layers of whipped cream with a single layer of graham cracker sheets. A touch of cinnamon in the whipped cream can further enhance the graham cracker flavor.
- Utilizing Cool Whip: As mentioned, for an ultimate shortcut, an 8oz container of frozen whipped topping (like Cool Whip) can seamlessly replace the homemade whipped cream. Just ensure it’s fully thawed in the refrigerator before you begin assembly to achieve the correct creamy consistency.
- Cream Cheese Infusion: For a richer, tangier, and even more stable filling, consider adding cream cheese to your whipped cream. Soften half of an 8oz brick of cream cheese (4oz) to room temperature and whip it until it’s light and fluffy. Gently fold this whipped cream cheese into most of an 8oz container of thawed Cool Whip. This creates a decadent, cheesecake-like frosting that pairs wonderfully with the chocolate wafers.
- Gluten-Free Alternative: For those with dietary restrictions, this dessert can still be enjoyed! Source or make your own gluten-free chocolate wafer cookies. Websites like Gluten Free on a Shoestring offer excellent recipes for thin and crispy gluten-free chocolate wafers that can be used in place of store-bought varieties, ensuring everyone can partake in this delicious no-bake treat.
- Coffee or Liqueur Flavoring: For an adult twist, add a teaspoon of instant espresso powder to your whipped cream, or a tablespoon of coffee liqueur or Kahlúa.
- Nutty Crunch: Sprinkle finely chopped toasted nuts (like pecans or almonds) between the layers for added texture and flavor.
Frequently Asked Questions About Icebox Cakes
To further enhance your understanding and appreciation of this classic dessert, here are answers to some common questions:
Why is it called an icebox cake?
The name “icebox cake” is a nostalgic nod to a bygone era. Before the widespread availability of electric refrigerators, homes relied on insulated cabinets called “iceboxes” to keep food cool. Large blocks of ice were delivered regularly to these iceboxes, allowing families to store perishable goods. Icebox cakes were specifically designed to be assembled from pre-made ingredients like cookies and whipped cream, then chilled in these iceboxes. The magic happened during this chilling process: the cookies would slowly absorb moisture from the whipped cream, softening and transforming into a delightful cake-like consistency without any baking required.
When were icebox cakes particularly popular?
Icebox cakes experienced a surge in popularity during two significant periods in American history: the Great Depression of the 1930s and World War II in the 1940s. During the Depression, these “no-bake” cakes offered an economical and accessible dessert option, as they used inexpensive, shelf-stable packaged cookies and minimal ingredients. In the war years, sugar and other baking staples were heavily rationed to support the war effort. Housewives ingeniously turned to icebox cakes to create delicious treats without using up precious sugar allocations. Companies even started printing simple icebox cake recipes on their cookie and cracker boxes, encouraging sales of these previously less popular items by showcasing their versatility in creating easy, no-bake desserts. They represented resilience and resourcefulness in the kitchen during challenging times.
Discover More No-Bake Desserts
If you’ve fallen in love with the simplicity and deliciousness of this Chocolate Wafer Icebox Cake, you’re in for a treat! There’s a whole world of no-bake desserts waiting to be explored, offering equally easy preparation and delightful flavors. Here are some more fantastic no-bake recipes to add to your repertoire:
- No Bake Chocolate Chip Cheesecake
- Lazy Cheesecake Salad
- No Bake Nutella Pie
- Berry Cheesecake Salad
- No Bake Peanut Butter Bars
We hope you thoroughly enjoy making and savoring this No Bake Chocolate Wafer Icebox Cake! If you found this recipe helpful and delicious, please consider leaving a 5-star review in the recipe card below or sharing your thoughts in the comments section. We love hearing from you! You can also tag us in your beautiful creations on Instagram @dashfordinner.
Chocolate Wafer Icebox Cake (Zebra Cake)
This chocolate wafer icebox cake is made with just 4 simple ingredients and is a no-bake recipe. Easy, delicious, and perfect for all occasions!
Print Recipe |
Pin Recipe |
Rate This Recipe
Course: Desserts, No Bake Desserts
Cuisine: American
Prep Time: 15 minutes
Chilling Time: 8 hours
Total Time: 8 hours 15 minutes
Servings: 8
Calories: 303kcal
Author: Dorothy Bigelow
Equipment
- Stand mixer or electric hand mixer
Ingredients
- 1 package chocolate wafer cookies (9 ounces)
Whipped Cream
- 1 ½ cups heavy whipping cream, chilled
- 3 tablespoons powdered sugar
- 1 teaspoon vanilla extract
For Garnish (Optional)
- Shaved chocolate
- Fresh raspberries or strawberries
Unit System: US Customary (no metric conversion functionality provided in static HTML)
Instructions
- Add chilled heavy cream to a large bowl or the bowl of a stand mixer, along with the powdered sugar and vanilla extract.
- Using an electric hand mixer or the whisk attachment for a stand mixer, whip the cream and other ingredients on medium-high speed until moderate peaks form, about 3-4 minutes. Stop the mixer and scrape down the sides of the bowl as needed.
- You will know the whipped cream is ready when you can pull the whisk portion out of the whipped cream and it holds its shape for at least 30 seconds before falling.
- Add about ½-1 cup of whipped cream to the center of a serving platter, spreading it down the middle into a 1 ½” wide rectangle.
- Place a heaping spoonful of whipped cream on each chocolate wafer cookie, sandwiching them together in a log on top of the line of whipped cream on the serving tray.
- Spread the remaining whipped cream on top of the line of chocolate wafer cookies, smoothing it out into an even layer so that it covers all of the cookies.
- Wrap it gently with plastic wrap (try not to allow it to touch the cake by using toothpicks to tent the wrap) and place it in the fridge to chill for 8-12 hours.
- Remove the zebra cake from the refrigerator and garnish it with shaved chocolate and fresh berries.
- Slice the cake diagonally, creating beautiful striped pieces (like a Zebra), serve and enjoy.
Did you try this recipe? Tag me at @dashfordinner and share your photos!
Notes
Shortcut option: Use thawed frozen whipped topping (Cool Whip) in place of the homemade whipped cream.
Nutrition
Calories: 303kcal | Carbohydrates: 27g | Protein: 3g | Fat: 21g | Saturated Fat: 12g | Polyunsaturated Fat: 2g | Monounsaturated Fat: 6g | Cholesterol: 51mg | Sodium: 197mg | Potassium: 110mg | Fiber: 1g | Sugar: 16g | Vitamin A: 660IU | Vitamin C: 0.3mg | Calcium: 39mg | Iron: 1mg
Please note that some of my blog posts here at Dash for Dinner may contain affiliate links. If you make a purchase through these links, I will get a small commission at no additional cost to you. Please see my Disclaimer for more information.
